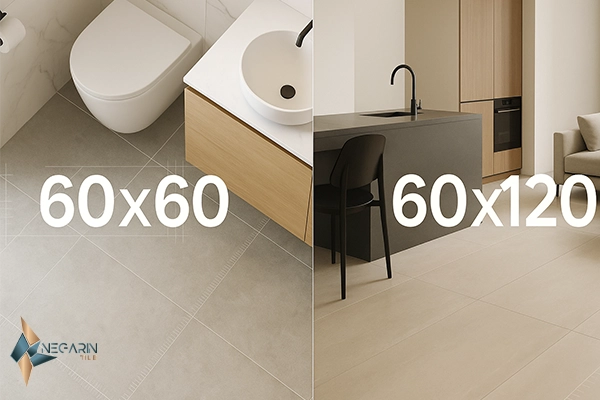
The core rule from this tile size guide: choose the largest tile that fits your layout without creating sliver cuts at walls or thresholds. In compact rooms, 60×60 cm or 30×60 cm looks modern and keeps grout lines low. In big, open areas, large format tiles like 60×120 cm create seamless flow—provided the subfloor is flat and joints stay at 2–3 mm with rectified edges.
Why tile size matters (and how this tile size guide helps)
Tile size affects visual scale, cleaning time, perceived room width, installation difficulty, and labor cost. This tile size guide gives you:
- quick-reference tables,
- golden rules that always work,
- layout math and easy calculators,
- room-by-room recommendations, and
- pro tips that prevent sliver cuts, lippage, and awkward transitions.
It also aligns with Negarin’s 60×60 and 60×120 offerings so you can build strong internal links.
Quick Reference Table — Tile Size Guide
| Room/Area | Go-to Sizes | Joint Width* | Notes |
|---|---|---|---|
| Small bathroom (≤4 m²) | 60×60, 30×60 | 2–3 mm rectified | Big tiles calm the grid; use mosaics/cuts for shower floor fall. |
| Family bathroom (4–8 m²) | 60×60 floors, 60×120 walls | 2–3 mm | Vertical 60×120 adds height; 30×60 niche bands align easily. |
| Powder room | 60×60 floor; 30×60 walls | 2–3 mm | Run floor tile up the vanity wall for a hotel feel. |
| Kitchen floor | 60×60 or 60×120 | 2–3 mm | Fewer joints = faster cleaning near cook zones. |
| Backsplash | 10×30 / 7.5×15 / 30×60 | 2–3 mm | Slice 30×60 → 15×60 for a clean horizontal band. |
| Living / open plan | 60×60, 60×120 | 2–3 mm | Large formats lengthen sightlines and reduce grout. |
| Hallway / corridor | 30×60 or 60×120 (run lengthways) | 2–3 mm | Orientation stretches the space visually. |
| Retail / lobby | 60×60, 60×120 | 2–3 mm | Rectified edges create tight, premium lines. |
| Covered outdoor (if rated) | 60×60 | 3 mm | Confirm exterior/frost & slip ratings on the datasheet. |
*Rectified tiles typically allow 2–3 mm joints; pressed edges often need 3–4 mm.
Pro tip from this tile size guide: plan layouts so no edge cut is under ⅓ of a tile. If a wall leaves tiny slivers, shift the starting line or step down one size.
Golden rules of sizing (that never fail)
- Go as large as the plan allows—without slivers. If the math yields 2–5 cm cuts, drop to 60×60 or change orientation.
- Aim for 3–6 tiles across the shortest room dimension (including joints). Fewer looks monolithic; more looks busy.
- Match orientation to the room. Rectangles (60×120, 30×60) elongate the axis they follow.
- Choose rectified edges when you want narrow joints and a hotel-style finish.
- Subfloor flatness scales with size. Larger tiles need flatter substrates and leveling clips to avoid lippage.
- Budget waste realistically. 10% for straight lays; 15%+ for diagonal/complex patterns.
These six principles are the backbone of any professional tile size guide.
Measurement & layout math (the heart of the tile size guide)
Step 1 — Measure correctly
- Record the shortest and longest clear dimensions (finished walls).
- Subtract fixed obstacles only when they break the layout into zones.
- Note door thresholds—aligning joints with them reduces awkward L-cuts.
Step 2 — Include grout in your math
For rectified 60×60 with 2 mm grout, the module width is 602 mm.
For 60×120 with 2 mm grout, module size is 602 × 1202 mm.
Step 3 — Apply the 3–6 Tiles Across rule
Example (small bath 1,700 mm wide):
1,700 ÷ 602 ≈ 2.82 tiles → under 3.
- Option A: switch to 30×60 (module ~302 mm) → 1,700 ÷ 302 ≈ 5.6 (within 3–6).
- Option B: keep 60×60 and center the grid, leaving about (1,700 − 2×602) ÷ 2 ≈ 248 mm each side (acceptable; not a sliver).
Step 4 — Avoid slivers (<⅓ tile)
On 60×60, any edge cut below ~200 mm looks mean; adjust the starting line or change size.
Step 5 — Quantity calculator
Tiles needed = (Room m² ÷ Tile m²) × Waste%
- 60×60 tile area = 0.36 m²
- 60×120 tile area = 0.72 m²
Example (kitchen 14 m², 60×60, straight lay):
14 ÷ 0.36 = 38.9 → 39 tiles × 1.10 = 43 tiles (round to full boxes).
Example (living 28 m², 60×120, straight lay):
28 ÷ 0.72 = 38.9 → 39 tiles × 1.10 = 43 tiles.
You can embed this math in a simple “Tiles Needed” calculator widget beside the tile size guide.
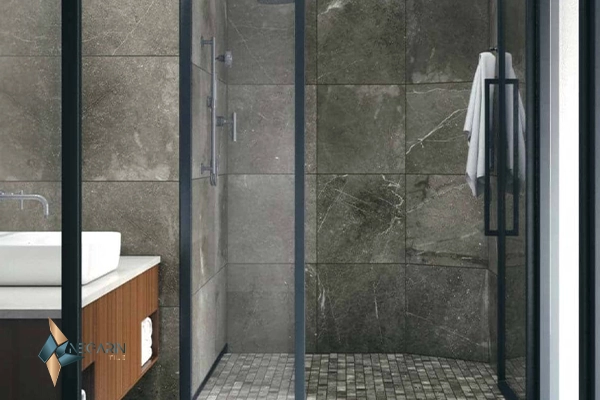
Bathroom deep dive — the most-searched section of any tile size guide
Floors: For most homes, 60×60 is the sweet spot—clean, modern, and low-maintenance. For shower floors, use mosaics or cut pieces to follow the slope.
Walls: 60×120 stacked vertically adds height; 30×60 horizontally widens narrow rooms.
Niches & bands: Set niche heights on multiples of 30 or 60 to avoid micro-cuts.
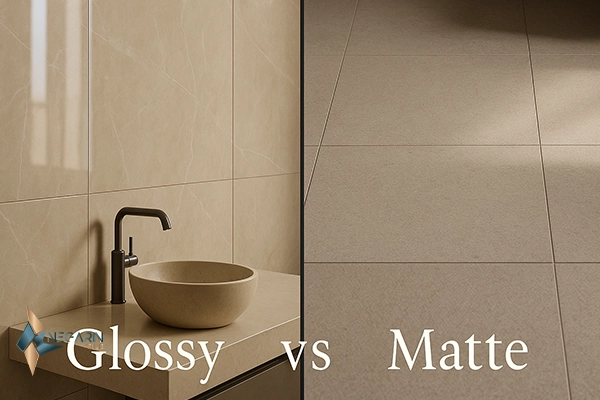
Finishes: Prefer matte/structured for floors (grip); glossy is great for walls.
Negarin pairings:
- Marble-look 60×60: SOHA Beige, EMAD Cream, AZORIT Beige
- Onyx-look walls: ALFA Ivory, LANDA Beige
- Calm micro-stone base: AZARRAKHSH Cream
Kitchen & dining — tile size guide for hard-working rooms
Floors: 60×60 is the golden standard. In larger kitchens or open plans, 60×120 run lengthways creates long, easy-to-clean bands.
Backsplashes: Go small-module (7.5×15 / 10×30) for texture, or slice 30×60 → 15×60 for a sleek horizontal ribbon.
Islands & appliances: Either align the grid to the island or center it so cabinet edges land on grout lines—not mid-tile.
Negarin ideas:
- Terrazzo that hides crumbs: MAHA Gray 60×60
- Warm statement floor: PEPSI Brown 60×60
- Bright, easy care: LANDA Beige 60×60
Living rooms & open plans — where large format tiles shine
If the substrate is flat, large format tiles such as 60×120 are unbeatable: fewer joints, faster mopping, and that quiet luxury vibe. If the floor waves or access is tight, 60×60 still reads premium.
Sightlines: Keep long tile runs parallel to the dominant wall or to the main view from the entry.
Centering: Align the grid with the main seating group or TV wall to avoid awkward edge cuts.
Hallways & corridors — small area, big impact
This tile size guide recommends 60×120 lengthways to “stretch” the corridor. If the hallway is narrow, 30×60 with a one-third offset works beautifully. Try to land joints on doorway thresholds to avoid notched L-cuts.
Bedrooms & suites
Calm and continuity matter most. 60×60 feels soft underfoot and is easier to cut around wardrobes and frames. For a “suite” effect, continue the bedroom tile into the ensuite (switch to a matte/structured version on the bathroom floor).
Retail, cafés, lobbies (light-commercial)
Durability and fast cleaning rule. Choose 60×60 or 60×120, rectified, with 2–3 mm joints. Mid-movement visuals (terrazzo, subtle marble) disguise dust between cleans.
Covered outdoor (if the product is rated)
Stick to 60×60 for controlled drainage and easier lippage control. Always confirm exterior/frost and slip ratings on the product datasheet. On light floors, pick a grout tone one or two shades darker to hide soil.
Grout strategy (color, width, visibility)
- Width: 2–3 mm for rectified; 3–4 mm for pressed.
- Color: match tile tone to minimize the “grid.” Slightly darker grout hides soil on floors.
- Offsets: for rectangles, a 1/3 offset limits plank lippage versus 1/2.
- Feature control: if the tile has bold veining, keep joints narrow so the pattern isn’t chopped.
Correct grout choices are a secret weapon in any tile size guide—they can make a standard tile feel premium.
Subfloor flatness & lippage control
- The larger the tile, the flatter the substrate must be. Self-leveling compound is your friend for 60×120.
- Use leveling clips on large formats to control lippage.
- Keep the subfloor clean and dry; honor perimeter movement joints and transitions.
Installation quality determines 90% of the finished result—no tile size guide works without proper prep.
Patterns, orientation & visual tricks
- Stack/straight bond: minimal and fast; perfect with 60×60.
- Running bond (1/3 offset): adds motion on 30×60 or 60×120.
- Herringbone: great for halls; expect more cuts and time.
- Modular mixes: combine 30×60 with 60×60 for a lively yet ordered surface.
These design moves amplify the effect of the sizes you choose.
Maintenance & lifetime appearance
Bigger tiles mean fewer joints and faster mopping. Whether you choose 60×60 or large format tiles, clean with neutral-pH products and seal the grout (glazed tiles themselves generally don’t need sealing).
Buying checklist (print-friendly)
- Exact room dimensions (short/long sides) + door positions
- Do the module math (tile + joint)
- Apply the 3–6 tiles across rule on the short side
- Eliminate sliver cuts (<⅓ tile) by shifting the start line
- Prefer rectified edges for 2–3 mm joints
- Waste: 10% straight / 15%+ diagonal or complex
- Plan subfloor leveling for large formats
- Pick finishes by slip needs (matte/structured for wet floors)
- Order a few extra boxes for future repairs (same batch/shade)
Case studies (applying the tile size guide)
Case 1 — Small bath, 1.8 × 2.2 m
- Goal: a continuous floor with no tiny edge pieces.
- Math: 1,800 ÷ 602 ≈ 2.99 → three 60×60 across works.
- Edge cuts: ~198 mm each side (borderline but acceptable). Center the grid and keep joints at 2 mm.
- Walls: 60×120 vertical to raise apparent height.
Case 2 — Kitchen–diner, 4.2 × 6.0 m
- Goal: long sightlines and easy maintenance.
- Option A: 60×120 lengthways → 4,200 ÷ 602 ≈ 6.97 (great); 6,000 ÷ 1,202 ≈ 4.99 (five rows).
- Option B: 60×60 if leveling is limited.
- Grout: 2 mm, slightly darker than the tile tone.
Case 3 — Corridor, 1.2 × 6.5 m
- Choose 60×120 lengthways → 1,200 ÷ 602 ≈ 1.99 (two full tiles across).
- Align joints with door thresholds to avoid notch cuts.
Visit Our Store To Find Anything that you need
Conclusion — Bottom line of this tile size guide
In small rooms, 60×60 (and 30×60 on walls) delivers clean lines without fiddly cuts. In larger spaces and open plans, large format tiles like 60×120 create seamless flow—if the substrate is flat and joints stay 2–3 mm. Follow the planning rules in this tile size guide—no slivers, the 3–6 rule, rectified edges, and smart orientation—and your results will look intentional, premium, and easy to live with.
Frequently Asked Questions
What is the best tile size for a small bathroom?
Typically 60×60 cm on floors and 30×60 or 60×120 on walls. Use mosaics or small cuts on the shower floor to follow the slope.
Are large format tiles OK in small rooms?
Yes. Fewer grout lines can make rooms feel larger. Avoid sliver cuts and keep joints 2–3 mm with rectified edges.
What grout width should I use for 60×60 tiles?
Rectified: 2–3 mm. Pressed: 3–4 mm. Matching grout color minimizes the grid effect.
Do large format tiles need special prep?
They require flatter subfloors, leveling clips, and careful handling. Budget for self-leveling compound where needed.
How many tiles do I need?
(Room m² ÷ tile m²) × 1.10 for straight layouts, or × 1.15 for diagonal/complex. Keep extra from the same batch.
Should kitchen backsplashes use small or big tiles?
Either works. Smaller modules add texture; sliced 15×60 bands give a sleek modern line aligned to cabinets.
Does tile size affect cleaning?
Yes. Larger tiles = fewer grout joints, so cleaning is faster. Seal grout to simplify maintenance.
Which looks more premium—60×60 or 60×120?
Both can look premium. 60×120 feels more architectural in large spaces; 60×60 is the reliable luxury baseline.
Can I mix sizes?
Yes—pair 30×60 walls with 60×60 floors or build modular patterns. Keep joint widths consistent.
How do I handle thresholds and doors?
Aim to land a joint or a full tile at each threshold. Dry-lay two rows to test alignment before applying adhesive.